What are the most important items to repair and/or replace when the budget is tight? While Exapta has a multitude of solutions to completely rebuild and transform your JD openers for improved seeding performance, we understand sometimes the budget requires a step-by-step approach. So, if you’re ballin’ on a budget, there are three critical points on the opener that MUST be checked and up-to-par before other upgrades will improve the unit and most importantly, your stand.
Main Pin & Bushings: The pins that the row unit rotates on should be inspected at least once every season. This is an important point for keeping the opener tight and running at the proper 7-degree angle so the blade can form a wide enough furrow for the seed boot to place seeds into the slot. When there is side-to-side movement the seed trench becomes narrower. If the main pin is worn enough that you can wiggle the opener more than ¼” side-to-side it should be replaced. This is easily measured at the blade as you wiggle the whole row unit. TIP: get extra wear life by rotating the pin. You can rotate the pin 180 degrees as the wear will always be on one side. Once you know the pin has fully been used, replace it.
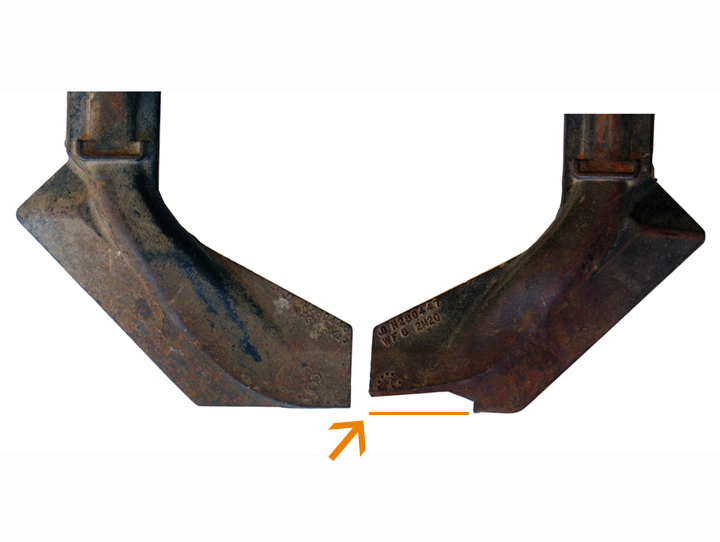
Seed Boots: Seed boots should be inspected and maintained—the wear is not obvious from casual inspection. Compare a worn-out seed boot with a new one (see pic below). The edge should be straight across like the seed boot on the left. When the bottom edge begins to form into a hook, performance is compromised dirt starts to fall into the furrow before the seed is placed. Check the boots in the tractor tracks first, as these shows wear the fastest.
Also check for up/down slop in the seed boot attachment point! Even on a brand-new 50/60/90 drill, this play is excessive and should be reduced by installing a 12mm bolt to remove some of the slop. Ideally, 1/8″ (and possibly ¼”) of movement at the rear edge of the boot is the sweet spot. For drills that have substantial wear in this spot (over 3/8″), rebuild it with one of the kits on the market.
Lastly for seed boots, make sure there is enough leaf spring strength to snap the boot back against the blade. There should be 10-12lbs of pressure. To check, lift the firming arm up, pull the boot away from the blade, and release it. A boot that is easily pulled away from the blade and does not snap back with a sharp ‘clang’ means the leaf spring is weak or broken. Exapta’s replacement springs are 20% stronger than OEM, and more affordable.
Blades: Blades should be replaced at 17 3/8″. The bevel is 3/4″ new. Once 5/8″ wears off, you are at the maximum dullness. Not only will you experience more trouble with hair-pinning, but the blades will struggle to cut the soil. See our most recent newsletter on blades.
In addition to cutting residue, blade diameter directly affects boot life and wear. The pennies saved from running blades longer than recommended will cost you dollars in accelerated boot wear. In most cases with a full-size blade the boot runs at ground level. As the blade wears down you will force the boot below ground level—accelerating boot wear. Exapta carries excellent long-lasting blades with the Forges De Niaux. Our farmer testing has proven the Forges de Niaux gives the best life compared to OEM.
Back to the budget, we strongly advise to first look at the basic row unit of these three critical wear points/items. If these three wear points are not up-to-spec to begin with, no amount of improvement parts will help you achieve better seeding. Give us a call to discuss if you have questions. We serve up only straight answers.
“We rebuilt the drill this year and it’s been extremely impressive on the rebuild. We put on the better blades [Forges de Niaux], DuraLok firming wheels and the Main Pins/Bushings. We got to noticing our seed slot was getting very narrow and we just happened to receive one of your flyers that addressed that. We had a lot of slop in those bushings. We planted about 700 ac of soybeans this year and we are getting the best stands we’ve ever seen with this drill. I am very impressed with your products! We don’t mind running this older equipment if you can make it work. You guys [Exapta] have figured out some stuff that other companies haven’t yet. And your service has been excellent. You have helped us out a lot.”
Jason Peters, Carthage, MO, Exapta customer since 2013


